Building a Django CRUD application in minutes
NOVEMBER 14, 2020
The Django framework for building python server applications has been around since forever and I believe that the reason for this is the speed at which you can develop apps without compromising on robustness.
To gauge the usefulness of any backend framework, a great litmus test is to see how easy it is to plug in a database to your application and expose the database models to the client via 4 operations - Create, Read, Update and Delete.
This functionality solves a big chunk of your problems, especially if you are building a product that is more front-end heavy and you want to spend as little bandwidth as possible on building your APIs.
What is CRUD?
An application server is nothing but a layer on top of a database which provides the ability for a client application to perform the following underlying operations.
- Create a new entry into a table in the database.
- Read the database table entries either by fetching a list of all entries or retrieving the details of a single entry.
- Update an existing entry in the database either by changing certain details or by replacing it entirely with a new one.
- Delete a database table entry either by removing it from the database or by simply marking it as deleted and deactivating it.
Django has ways of doing all of this right out of the box, but I prefer to use a framework written on top of Django called the Django Rest Framework which makes things even simpler by providing an intuitive interface to the developers.
A sample CRUD application
I write all my blog posts on the apple notes app before I edit and publish them and it occurred to me that a note taking app is a great way to demonstrate a CRUD application.
A note taking app that we will build using Django and Django Rest Framework
To build an application like this, we need a database table that stores a list of notes consisting of a Title, Content and the last updated timestamp. The notes are sorted according to the last updated timestamp.
To build this application we need the following functions:
- Creating a new note with an empty title and content.
- Updating the newly created note with a title and content.
- Reading the fields of a note.
- Partially updating the note by modifying either tile or content.
- Listing all the notes in the database sorted by last updated timestamp.
- Deleting a note by marking it as deactivated.
I will be going through all the steps involved in creating this application, but first let's start with the basics.
Setting up a Django project
There is some basic boilerplate code involved in building any Django application. Here is a summary of all the steps needed to set up the boilerplate
| # Step 1: create a python3 virtual environment called django_env | |
| python3 -m venv django_env | |
| # Step 2: Activate the virtual environment | |
| source django_env/bin/activate | |
| # Step 3: Install all the dependencies. | |
| pip install django | |
| pip install djangorestframework | |
| # Step 4: Create a new django project called "notesapp" and enter it. Also create the initial database tables | |
| django-admin startproject notesapp | |
| cd notesapp | |
| python manage.py migrate | |
| # Step 5: Create a new application within your django project called "notes" | |
| python manage.py startapp notes |
Need for a virtual environment
While building any python applications, it is recommended to create a virtual environment and install all the packages you need within this environment to keep them isolated from the rest of your machine. This not only ensures prevention of conflicts but also makes it easy to deploy this application anywhere you want.
Once this virtual environment is activated, your development environment is setup.
Creating a Django project
Once the virtual environment is created and the necessary python packages are installed, the boilerplate code you need can be created by using a nifty tool called django-admin. We will use this to create a project called notesapp. This not only creates the project structure but also configures a default SQLite database that you can use for the application.
This database is nothing but a single file created locally with the name db.sqlite3 and is very handy to quickly prototype your application. You can change the database settings inside settings.py to point it to any database. This can be done later too once the basic functionality of your application is ready and works with SQLIte.
After your Django project is created, you also have to create a new Django app which we will use to define our models and APIs. Let's call this notes. Make sure to add this to the INSTALLED_APPS section of your settings.py
Creating database models
Before writing the CRUD APIs, we must first create a database model on which we wish to perform the CRUD operations. Let us create a model called Note in notes/models.py.
| from django.db import models | |
| class Note(models.Model): | |
| # both these fields can be empty when you create a new note for the first time | |
| title = models.CharField(max_length=255, null=True, blank=True) | |
| content = models.TextField(null=True, blank=True) | |
| # notes will be sorted using this field | |
| last_udpated_on = models.DateTimeField(auto_now=True) | |
| # to delete a note, we will simply set is_active to False | |
| is_active = models.BooleanField(default=True) | |
| def __str__(self): | |
| return self.title | |
Before we proceed we must update the schema because a new database table needs to be created in the underlying database. This can be done by creating and running migrations
| python manage.py makemigrations | |
| python manage.py migrate |
Creating the CRUD APIs
Now that the model has been created, we need a way to perform CRUD operations on this model by writing as little code as possible. This is where Django Rest Framework comes in. Not only can you expose CRUD APIs on this model within minutes, but you also get a pretty nifty user interface to view those APIs in action.
To do this, you must first define a serializer for the database model you created in the above step.
Defining a serializer
A serializer is responsible for two things
- To validate an incoming create/update request and reject it if the fields are not in the format that is required to create/update an entry in the database table.
- To convert a database table entry into a format like JSON that can be transferred over the internet to the client.
Let us create a serializer in notes/serializers.py as follows.
| from rest_framework import serializers | |
| from .models import Note | |
| class NoteSerializer(serializers.ModelSerializer): | |
| is_active = serializers.BooleanField(read_only=True) | |
| class Meta: | |
| model = Note | |
| fields = ('id', 'title', 'content', 'last_udpated_on', 'is_active') | |
Inside the Meta class, we define which database model is being serialized and what all fields within that model should be serialized. We could choose to include only certain fields from the model that we would like to expose over the API.
We can also define certain fields as read_only which indicates that these fields will be ignored if present in a create/update request but they will be present in the response a read request.
In this above case, is_active is responsible for indicating if a note has been deleted or not. Therefore we must not allow it to be modified via a create/update request and it should be set to false only when a delete operation is performed. This will become more clear in the upcoming steps.
We can also define fields as write_only which will indicate that these fields will not be present in a read response but we will allow the field to be modified in a create/update request. We can now proceed to writing the CRUD APIs
Defining an API View set
In Django, the APIs are written in views.py and each API that does some operation on a certain database resource is a view. In our case we will be performing multiple operations on the database model and hence what we need is a viewset. Here is how you define one in notes/views.py
| from django.shortcuts import render, get_object_or_404 | |
| from rest_framework.viewsets import ModelViewSet | |
| from .models import Note | |
| from .serializers import NoteSerializer | |
| class NoteViewSet(ModelViewSet): | |
| serializer_class = NoteSerializer | |
| def get_object(self): | |
| return get_object_or_404(Note, id=self.request.query_params.get("id")) | |
| def get_queryset(self): | |
| return Note.objects.filter(is_active=True).order_by('-last_udpated_on') | |
| def perform_destroy(self, instance): | |
| instance.is_active = False | |
| instance.save() | |
This viewset is now capable of performing all the CRUD operations and it will use the NoteSerializer to determine how the data will be received and how it will be sent back to the requesting client.
Since a read operation could be retrieving a single note or listing all the existing notes, we need a way to handle both cases.
The get_object is responsible to determine how an object is retrieved. In this case we look for an id field in the query parameters of a a request and use that to retrieve a note.
This method is also used while making an update operation because to update a particular note we would have to first retrieve that note.
The get_queryset method is responsible for determining how a list operation will work. In this case we will be listing all the notes which are still active and sort them in the decreasing order of the last_udpated_on timestamp.
The perform_delete method will determine what to do when a delete operation is requested. In this case we do not want to delete the row from the database and we simply want to deactivate it. Therefore we will be setting the is_active field to False and saving the note.
Defining the URL path
We just have one more step to complete before we can see our APIs in action and that is to determine what URL path will invoke the above viewset. This can be done in notesapp/urls.py as follows.
| from django.contrib import admin | |
| from django.urls import path | |
| from notes.views import NoteViewSet | |
| from django.conf.urls import url | |
| urlpatterns = [ | |
| # the admin path is present by default when you create the Django profject. It is used to access the Django admin panel. | |
| path('admin/', admin.site.urls), | |
| # the URLs for your APIs start from here | |
| url(r'^note$', NoteViewSet.as_view( | |
| { | |
| 'get': 'retrieve', | |
| 'post': 'create', | |
| 'put': 'update', | |
| 'patch': 'partial_update', | |
| 'delete': 'destroy' | |
| } | |
| )), | |
| url(r'^note/all$', NoteViewSet.as_view( | |
| { | |
| 'get': 'list', | |
| } | |
| )), | |
| ] | |
To explain what is going on here, we are basically saying that if the url /note is called, no matter what the HTTP method is, we will be invoking the NoteViewSet and based on what the HTTP method is we will call a particular method within this viewset.
- A POST call will result in a create operation of the Note model.
- A GET call will result in retrieving a single Note model object using the id query parameter.
- A PUT call will result in replacing an existing Note model with a new Note and the existing Note model will be fetched using the id query parameter.
- A PATCH call will result in modifying only a certain field inside an existing Note model instead of entirely replacing it and the existing Note model will be fetched using the id query parameter.
- A DELETE call will result in calling a destroy function which internally calls the perform_destroy method defined above in views.py.
In case you haven't noticed, there is one thing missing in this url PATH and that is the ability to list all the existing Note model objects.
To solve this I created another URL path /note/all where I am invoking the same viewset as the above one with the difference being the GET call will now invoke a list method on the viewset instead of a retrieve method which means that the get_queryset method defined earlier will be invoked.
See your APIs in action
Okay enough talk, let us now run the server and view the APIs in action. You can run the Django development server using the below command and it will expose your server on the 8000 port on localhost.
| python manage.py runserver |
Please do not forget to include rest_framework in the INSTALLED_APPS section of notesapp/settings.py or you will end up seeing weird errors.
| INSTALLED_APPS = [ | |
| 'django.contrib.admin', | |
| 'django.contrib.auth', | |
| 'django.contrib.contenttypes', | |
| 'django.contrib.sessions', | |
| 'django.contrib.messages', | |
| 'django.contrib.staticfiles', | |
| #include rest_framework here | |
| 'rest_framework', | |
| 'notes' | |
| ] | |
To see our APIs in action, let us call http://localhost:8000/note?id=1 and see what happens.
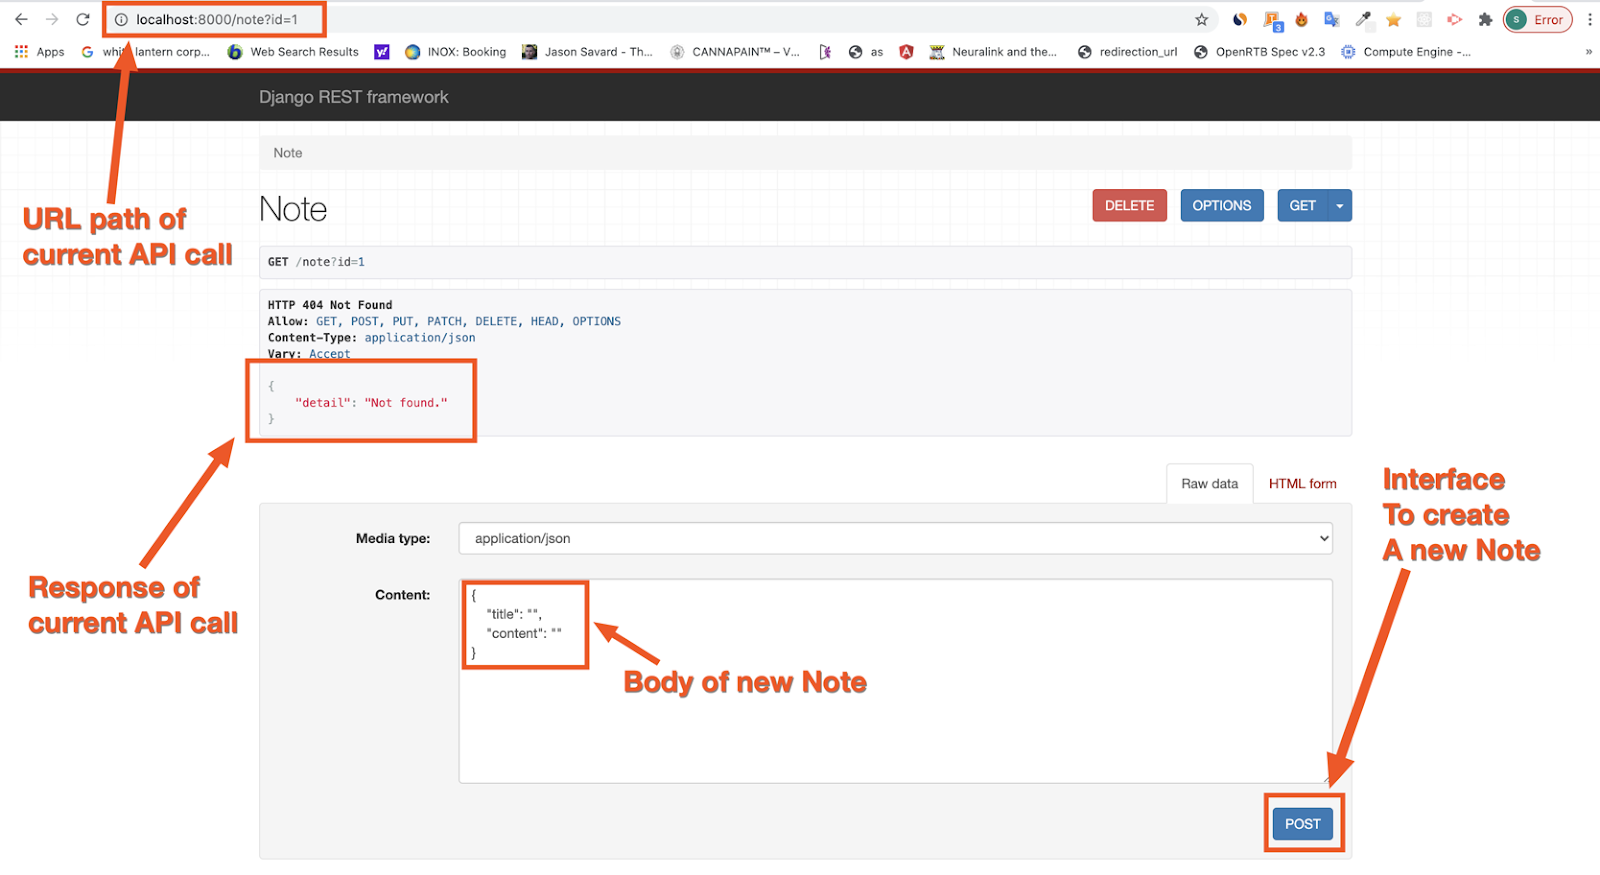
Interface provided by DRF to view your APIs
Pretty cool right? Since there is no Note that currently exists in the database the response says "Not Found" but you can now use this same interface to create a new Note in the database.
So let us hit the POST button with an empty title and content and see what happens.
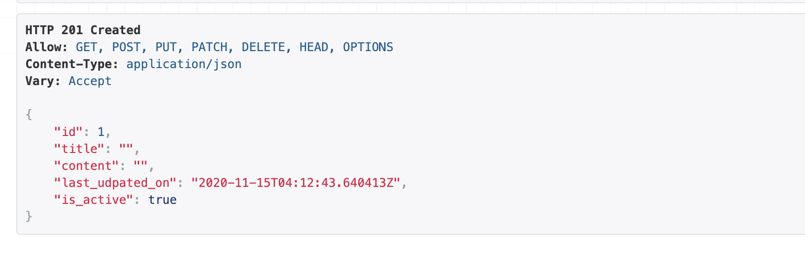
Response of a POST call
Congratulations! you just called your very first create API and created an empty note in the database. If you now refresh the page you will see the result of the Note object with id=1. Let us now update this entry with a title and content using the PUT method.
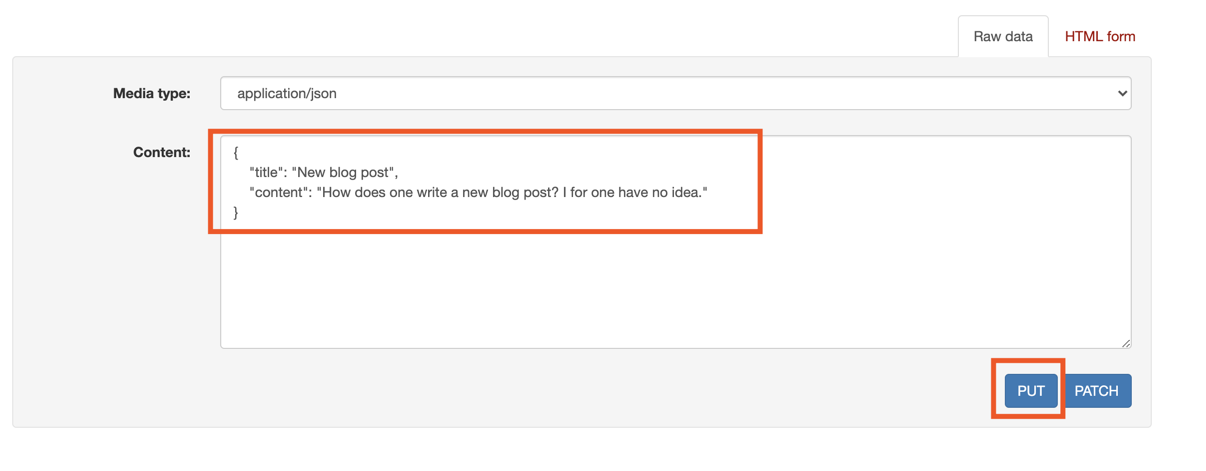
Updating an existing Note object using PUT
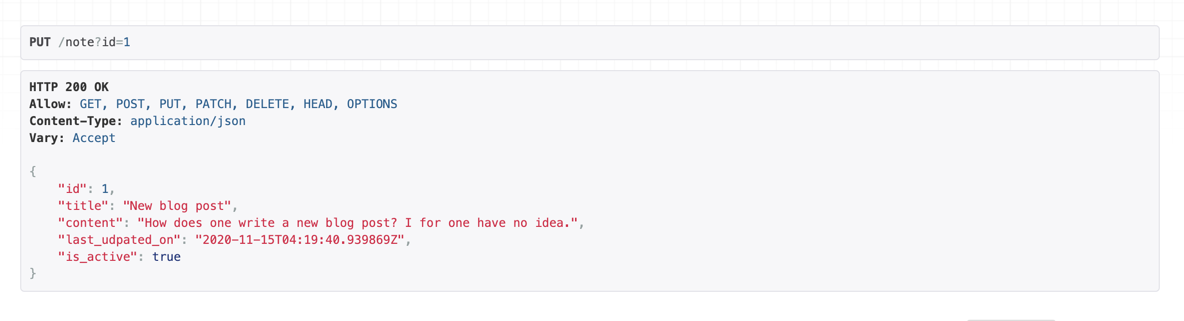
Response of updating the Note object with id=1
Great, so a full update is working. Let us now try to make a partial update which modifies only the title field and keeps the remaining data intact. This can be done using the PATCH method.
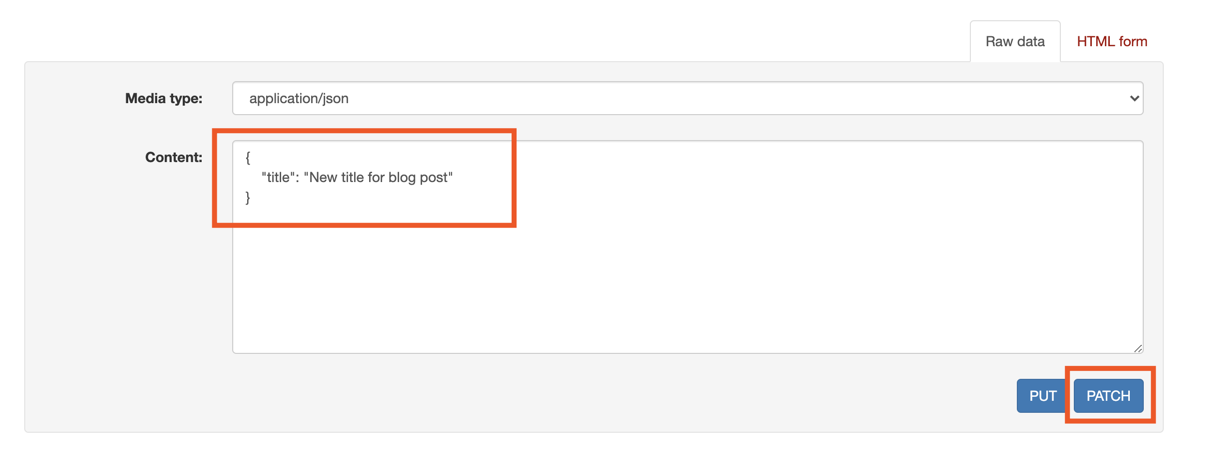
Partially update an existing Note object using PATCH
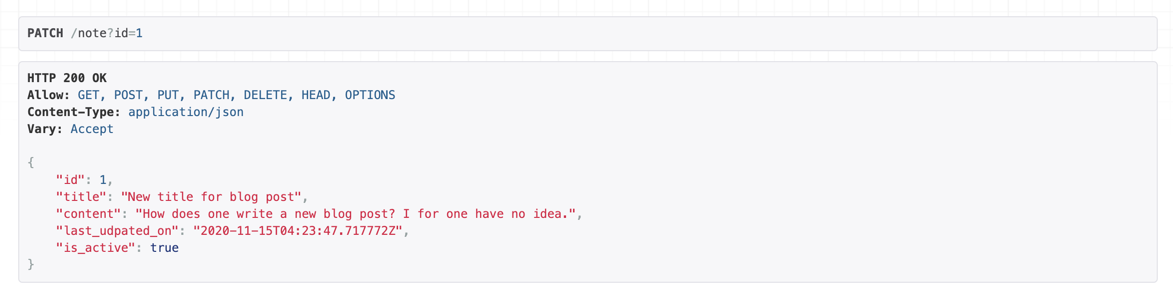
Response of partially updating the Note object with id=1
So far we were successfully able to execute the operations - retrieve, update and partially update. Let us now create another Note object using the POST method and then call the /note/all URL to see how a list operation would look like.
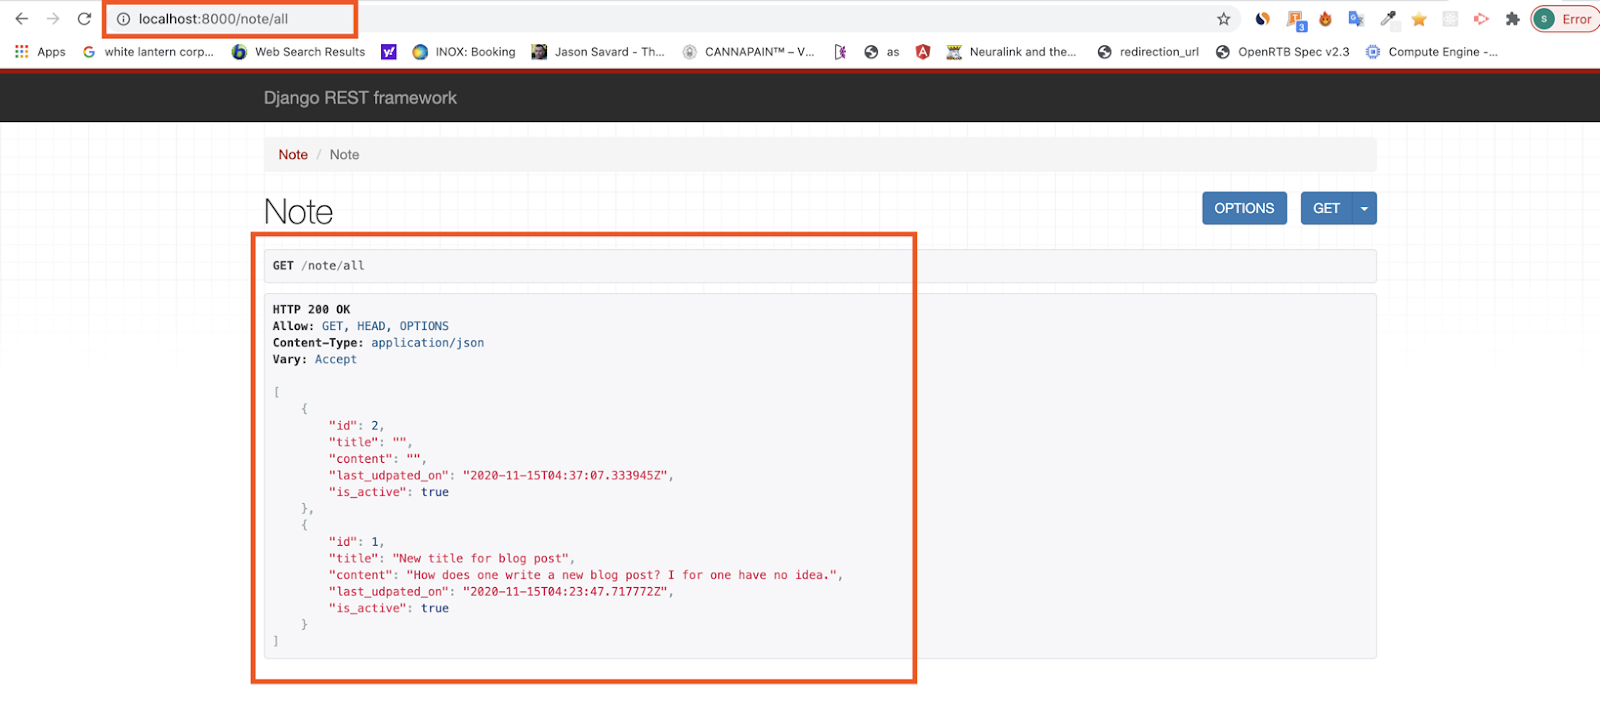
Response of a list API call
As you can probably guess, the only thing that remains now is the delete operation. Performing this operation should simply result in toggling the is_active field. Let us go ahead and check if this is working as intended or not.

Call the DELETE method from here
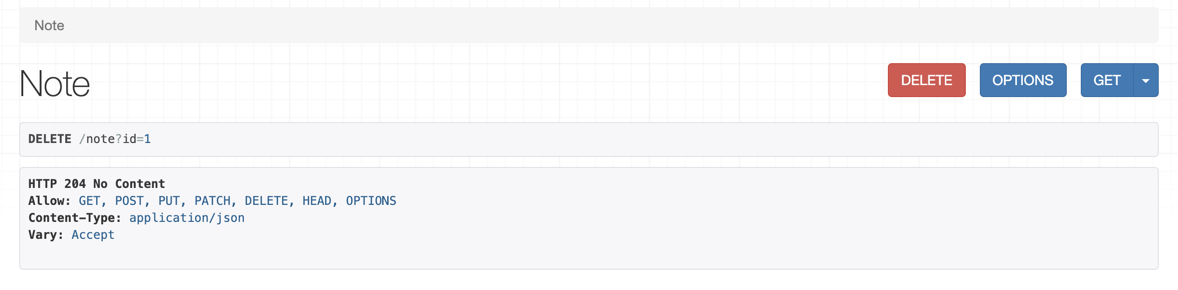
Response of the DELETE method
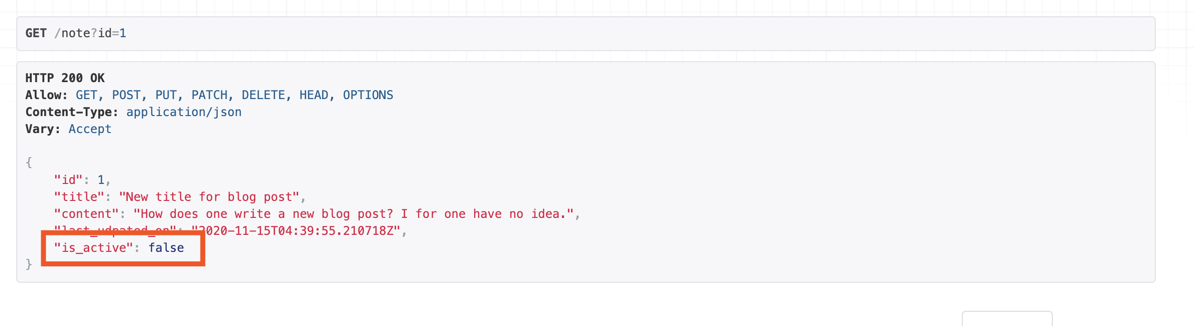
Response of GET on the Note object which was previously deleted.
So there you have it, our CRUD APIs are ready and we hardly wrote any code. This blog post might take longer to read than a few minutes, but I promise that actually creating this project and get these APIs up and running should take 5 minutes or less.
Closing notes
The User interface demonstrated above is meant to serve as a reference for the person developing the client side application. A client can call these REST APIs wherever it sees fit to make the note taking application look like apple notes.
The full codebase for the notes application can be found on github here. This project is meant to be used as a reference and boilerplate for any Django application that you might want to build.
If you don't want to use Django Rest Framework and build CRUD APIs with whatever Django provides out of the box. Here is a great piece written by geeksforgeeks to achieve this.